Using Azure Active Directory for Single Sign On with Snap 365
How it works:
Schedulers enter user name and passwords to log into Snap Schedule 365, while employees use employee codes and passwords. However, your company policies may require these users to log in from your organization instead of directly into Snap Schedule 365. Therefore, you can utilize Single Sign On (SSO) to authenticate schedulers and employees using your company-managed credentials instead of those within Snap Schedule 365.
Each scheduler or employee’s login credentials are mapped to the credentials of a user in your organization so schedulers and employees must login to your Azure Active Directory account instead of Snap Schedule 365. In order to authenticate users against your Azure AD, Snap Schedule 365 needs the manifest file created by Azure. Likewise, Snap Schedule 365 will authenticate itself to your server by sending you a certificate.
Note that Snap Schedule 365 and Snap Schedule 365 Employee Remote Access are two different applications using two different URI’s, so if you would like both schedulers and employees to use Single SIgn On, you’ll need to register two applications in your Azure Active Directory.
Registering Snap Schedule 365 as an Enterprise Application in your Azure Active Directory
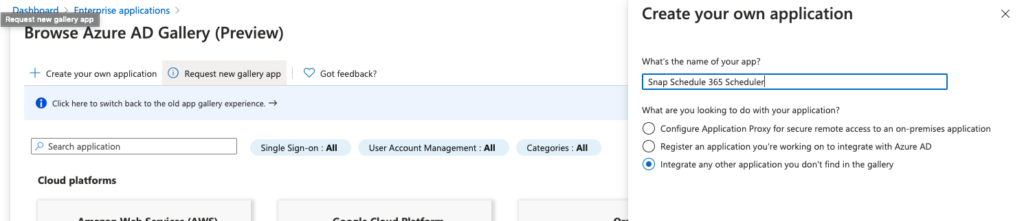
To register Snap Schedule 365 or Snap Schedule 365 Employee Remote Access as a new enterprise application in your Azure Active Directory, navigate to “Enterprise Applications” and click on the “New Application” button.
Snap Schedule 365 is not presently listed in the Azure AD Gallery, so click the “Create your own application” button to get started. Enter the name as you’d like the application to appear (e.g. Snap Schedule 365 Scheduler) and click the “Create” button.
Follow the first step in the “Getting Started” section, and assign which users or groups you would like to have access to Snap Schedule 365.
Next, select the “Single sign-on” tab and choose the “SAML” method. In the “Basic SAML Configuration” box, enter the following, depending on which Snap Schedule 365 application you are registering. Note that <company_code> should be the company code of your Snap Schedule 365 account.
Snap Schedule 365 Scheduler
| Identifier (Entity ID) | https://app.snapschedule365.com |
| Reply URL | https://app.snapschedule365.com/account/ssoservice |
| Sign on URL | https://app.snapschedule365.com/<company_code> |
| Relay state | <leave blank> |
| Logout URL | https://app.snapschedule365.com/account/sloservice |
Snap Schedule 365 Employee Remote Access
| Identifier (Entity ID) | https://era.snapschedule365.com |
| Reply URL | https://era.snapschedule365.com/account/ssoservice |
| Sign on URL | https://era.snapschedule365.com/<company_code> |
| Relay state | <leave blank> |
| Logout URL | https://era.snapschedule365.com/account/sloservice |
The second box (User Attributes & Claims) and the third box (SAML Signing Certificate) can be left as is.
The information in the fourth box (Setup Snap Schedule 365 Scheduler) needs to be provided to the technical support team at Snap Schedule. Please copy and paste the following entries from this box into an email addressed to support@snapschedule.com.
| Login URL |
| Azure AD Identifier |
| Logout URL |
The technical support team at Snap Schedule will configure your account for Single Sign On using this information. When complete, the team will let you know and you when you may test the SSO process.
When registration is complete
Once the Snap Schedule technical support team has configured your Snap Schedule 365 account to use Single Sign On, you can navigate to https://app.snapschedule365.com/account/login?companycode=<company_code>, where <company_code> should be replaced with your Snap Schedule 365 company code.
Alternatively, you can use the Azure Application Portal and select the Snap Schedule 365 enterprise application you just registered to launch the the app. If you would like to personalize the application entry with with a Snap Schedule 365 icon, this icon has been created to Azure’s specifics.

When you use either of these methods, you will be redirected to your Azure Active Directory portal located at the Login URL you provided above. If you are not already logged into your Azure account, you will be prompted to do so. Once logged in, you will be directed back to Snap Schedule 365 and, if a matching user is found, you will be logged into your Snap Schedule 365 account.